A JVM in Rust part 4 - The Java bytecode
This post is part of the Writing a JVM in Rust series.
In this post, I will discuss how the JVM bytecode works. In the next part, I will go over the RJVM code that executes it.
Tools and references
The JDK includes a great tool to help you investigate the Java bytecode - it is called javap and it is included in every JDK distribution. The basic usage is this:
javap -c -p <path-to-class-file>
This will print out every method with its bytecode instructions. You can check out its documentation for more details.
The reference documentation for the JVM instruction set is here.
The JVM bytecode
When the JVM executes a method, it has access to two data structures: the stack and the local variables.
The stack is quite simple - it is really just a standard stack, from which various bytecode instructions will push and pop values.
Method arguments are passed in the local variables. For non-static methods, the this pointer will be passed in the first variable slot. The local variables are not limited to method arguments though; the compiler can generate bytecode that uses them also as scratch space, if necessary.
Notice that the local variables and the stack aren’t typed - they can and will contain any mix of values. At runtime, a value will be of one of these types:
- 32 bits
int, which will be used forint,short,byte,char, andbooleantypes; - 64 bits
long - 32 bits
float - 64 bits
double - object references, which include standard objects, arrays, and
null - a “return address”, used to implement
try/finallyand that we will not discuss.
Notice that there is yet another historical weirdness - in the stack, 64 bits values will occupy one slot. However, in the local variables, a long or double value will occupy two slots, similar to how it is stored in the constant pool.
When loading a class, the JVM will go through a process called verification to ensure that everything is coherent, i.e. a pop will never find the stack empty, an instruction expecting an int will actually find an int value, and so on. I have not implemented these rules in RJVM as they are rather complex, and I have relied on returning an error in case of any problem. In hindsight, this caused quite a bit of problems during development - I should have opted for a panic instead.
Finally, the JVM will keep a program counter (pc), i.e. an address of the next instruction to execute. At the beginning of the execution of a method, it will be zero, and after executing an instruction it will move ahead, but as we will see later some instructions can modify it.
A simple example
Let’s start simple: let’s do some math. This is a very simple Java class:
public class TestBytecode {
    int sum(int a, int b) {
        return a + b;
    }
}
If we compile it and invoke javap on the generated class file, we get this output:
Compiled from "TestBytecode.java"
public class TestBytecode {
  public TestBytecode();
    Code:
      # (omitted)

  int sum(int, int);
    Code:
       0: iload_1
       1: iload_2
       2: iadd
       3: ireturn
}
Notice that we get two methods in our class; the first is the constructor, automatically generated by the compiler. We will discuss it later; for the moment, let us focus on the sum method. As you can see, its implementation contains four instructions:
iload_<x>will push a local variable value on the stack. The variable must be a 32-bit integer. Thus, our method will push first the variable in slot #1 (i.e. the first argument), then the second one;iaddwill pop two 32-bit integer values from the stack, add them up, and push the resulting sum;ireturnwill pop the stack head, which will be a 32-bit integer, and return from the method with that value.
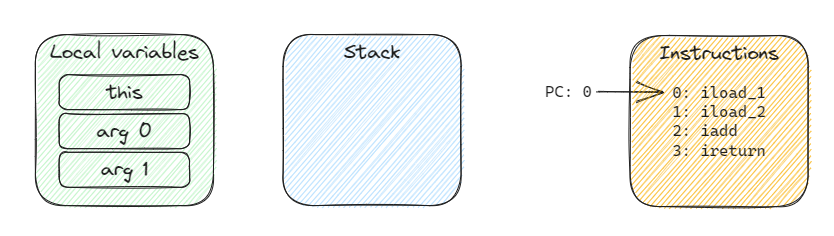
Let us simulate the behavior of the JVM. This is the initial situation when the method is invoked:
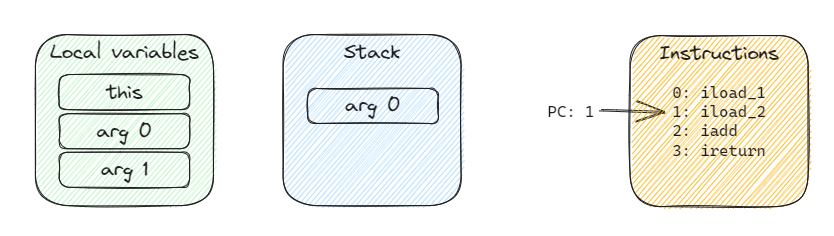
After executing the first instruction, we will find that arg 0 was pushed to the stack and pc was advanced by one.
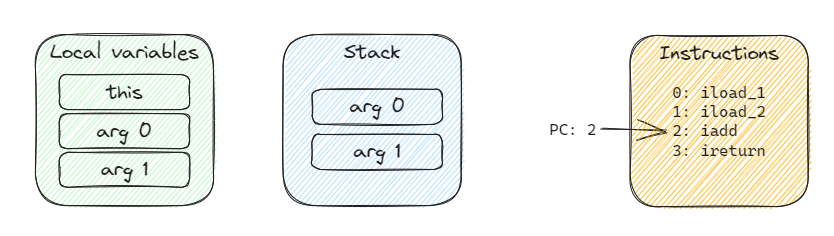
The situation after executing the second instruction is as follows:
Executing the third instruction, iadd, will remove the two values from the stack and push their sum:
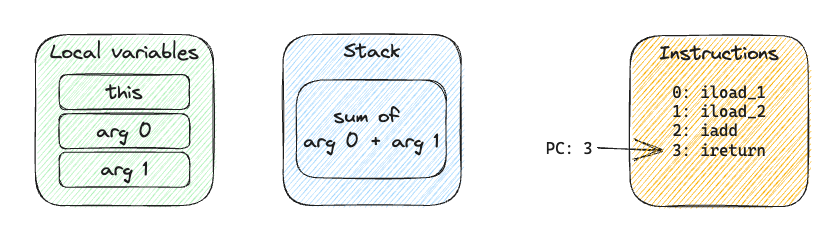
Finally, ireturn will simply complete the execution of the method and return the stack’s head.
Arithmetic instructions
This pattern of push and operate on the stack’s head is quite common in the JVM, and indeed, is a defining characteristic of how stack-based virtual machines operate. In the JVM, all arithmetic instructions operate like this, for example.
You might have noticed that, in the example above, all instructions started with an i prefix. This is because they operate on a 32-bit integer value. There are similar families of instructions for 64-bit integers and for both 32- and 64-bit floats, i.e. there exist ladd, fsub, dmul, and so on.
There exist also instructions to do bit manipulations, for example, iand or lor, or to do bit shifting like ishl or lshr.
Operating with the stack
Various families of instructions can push values to the stack: we have seen before iload_<x>, which pushes a 32-bit integer local variable. Notice that there are various of these instructions: for example, for 32-bits there are explicit instructions for iload_0 until iload_3. But what about accessing the local variable in slot 4? In that case, there is a generic instruction, which is followed by an argument: iload. In the bytecode, you would find first the byte 0x15 for iload, and then another byte treated as the unsigned index of the variable to push on the stack. Therefore, after executing this instruction, the program counter would move by two positions, since it is a physical address in the bytecode and not a logical instruction number.
Other than accessing a local variable, there are families of instructions for pushing a constant, for example, lconst_0 or dconst_1. The ldc family of instructions will instead push a value from the class constant pool that we discussed in part 2.
Other instructions that operate on the stack include:
pop;dup, which will duplicate the stack’s head (i.e. pop once and push twice);swap, which will swap the stack’s two top values;istoreand related, which pop the stack’s head and store the value into a local variable.
Invoking methods
Before discussing the instructions to execute a method, I want to be aligned on the terminology: in Java methods are by default virtual, i.e. they can be overridden by subclasses. It is required to use the final keyword at compile time to prevent this (which translates into a flag in the class file).
The following code will print Derived::foo, because even though the parameter b in invoke is declared of type Base, the correct version of the virtual method will be resolved at run-time.
class Base {
  void foo() {
    System.out.println("Base::foo");
  }
}

class Derived extends Base {
  @Override void foo() {
    System.out.println("Derived::foo");
  }
}

class Invoke {
  public static void main(String[] args) {
    invoke(new Derived());
  }

  private static void invoke(Base b) {
    b.foo();
  }
}
The instruction invokevirtual will perform the virtual method resolution. If we run javap to check the bytecode for Invoke, we get:
private static void invoke(Base);
  Code:
     0: aload_0
     1: invokevirtual #16  // Method Base.foo:()V
     4: return
First, we have an aload_0, which will load the first local variable of type reference (i.e. object) into the stack. Then we have an invokevirtual followed by a 16, which is the index of a constant of type MethodReference in the pool. This constant will contain:
- the class name;
- the method name;
- the method descriptor, which is necessary given that the JVM has method overloading, meaning that a class can have two distinct methods
foo(int)andfoo(String), and thus the namefoowould not be enough to distinguish which method to invoke.
Notice that, in the example above, this constant will refer to the method Base.foo ()V, i.e. the base class’ method, since the variable b is of type Base. However, at runtime, the actual type of the parameter will be checked and the correct version of the virtual method will be resolved and invoked.
Another similar instruction is invokeinterface, which applies when the method is invoked via an interface and not via a concrete base class. This instruction will still apply virtual method resolution. It feels a bit redundant, but it is actually subtly different from invokevirtual - this StackOverflow answer has some more information about it.
The third important instruction is invokespecial - this instruction will not apply virtual method resolution. This is very useful for invoking, for example, the superclass’ constructor, or when a method does something like:
class Derived extends Base {
  @Override
  void foo() {
    super.foo();
  }
}
Virtual method resolution would cause an infinite loop, and thus invokevirtual cannot be used, while invokespecial does the trick.
The fourth instruction is invokestatic - which will not apply virtual method resolution (since static methods cannot be overridden) and will not pass this in the first variable slot.
The final instruction, invokedynamic, is far more complex and forms the basis of the lambda mechanism in Java 8 (among other things). I have not implemented this function in RJVM and I will not discuss it here, but you can refer to baeldung.com or to this presentation by Brian Goetz for more details.
Working with objects
The next family of instructions we will discuss is used to manipulate objects. The new instruction will create a new instance of an object, but will not invoke its constructor.
Note that, in the JVM, each class always has a constructor - if you do not write it explicitly, the compiler will generate it for you. They are implemented as standard methods, named <init>, and they always return void, but, of course, they can take any number of arguments. Thus the following Java code:
class DummyBean {}

class Objects {
  DummyBean foo() {
    return new DummyBean();
  }
}
will map to this bytecode:
DummyBean foo();
  Code:
     0: new           #7  // class DummyBean
     3: dup
     4: invokespecial #9  // Method DummyBean."<init>":()V
     7: areturn
First, the new object will be created. Notice that, before invoking its constructor, a dup instruction will be used, as invokespecial will “consume” the value. This pattern new/dup/invokespecial <init> is used pretty much all the time, whenever a new instance of an object is created.
To access an object’s fields, the instructions getfield and putfield will be used. The former will pop the object reference from the stack and push the fields’ value. The latter will pop the object and the value to set, and not push anything to the stack. Notice that these instructions are not getter/setter methods, but rather they are used in getters and setters implementations.
For static fields, there are the related instructions getstatic and putstatic.
Arrays
Arrays have a few dedicated instructions: newarray will create a new instance of a primitive array, and anewarray will create a new array of a given class.
arraylength will pop the array from the stack and push its length. Finally, <x>aload and <x>astore are used to read and write the array elements.
Control flow
Let us now discuss how an if or for is mapped to bytecode. The solution is… a bunch of goto! You know, that thing that Dijkstra told us to not use! 😉
The basic idea is to use conditional jumps, i.e. instructions that will move the program counter depending on the values on the top of the stack. Let us see an example: this is the Java code:
public static int max(int a, int b) {
  if (a > b) {
    return a;
  } else {
    return b;
  }
}
and this is the compiled bytecode, which I have interleaved with the source:
public static int max(int, int);
  Code:
#      if (a > b) {
    0: iload_0
    1: iload_1
    2: if_icmple     7
#        return a;
    5: iload_0
    6: ireturn
#      } else {
#        return b;
    7: iload_1
    8: ireturn
#      }
The first two instructions will simply move the values of a and b onto the stack. The third instruction, at location 2, will compare the two values and, in case the first value is lesser or equal (le) than the first, jump (i.e. set the program counter) to address 7, where the body of the else is contained. Otherwise, the method will continue executing the instruction at location 5, which contains the body of the if branch.
There are a lot of different instructions that will cause a jump:
- the
if_cmp<xx>family will compare the top two values on the stack and jump depending on their comparison; - the
if<cond>family will compare the stack’s head with zero; ifnullandifnonnullare pretty self-explanatory;ifacmpeqandifacmpnewill jump if the two objects on top of the stack are (respectively) the same or not;- finally,
gotowill always jump.
Every while loop can be implemented with a conditional jump at the beginning, to skip the loop body, and a goto after the end, to restart it. For example:
public static int loop() {
  int a = 0;
  while (a < 10) {
    ++a;
  }
  return a;
}
becomes:
public static int loop();
  Code:
#      int a = 0
    0: iconst_0
    1: istore_0
#      while (a < 10) {
    2: iload_0
    3: bipush        10
    5: if_icmpge     14
#        ++a;
    8: iinc          0, 1
#      }
    11: goto          2
#      return a;
    14: iload_0
    15: ireturn
The loop starts at address 2 and the condition is checked by instructions with addresses 2, 3, and 5. The loop body is implemented by the single instruction at address 8 and it is restarted at address 11.
Every for loop can be trivially rewritten as a while, so you should be able to guess how it is expressed in the bytecode.
Conclusion
There are a few other instructions that I have left out, but you should have no big problems understanding them from the JVM specs. I hope this shed some light on how the JVM actually works. I recommend you try to write some simple methods and investigate the generated bytecode to get a better understanding of it.
As usual, thank you for reading this post. In the next part, I will go over some of the code in RJVM that executes the bytecode.